Hierarchic Layout
Overview
The hierarchical layout is a unique and powerful tool in the world of data visualization. It is designed with a specific structure in mind, where nodes are systematically distributed across various layers. This distribution is not random, but rather, it is carefully planned to ensure that the majority of the connecting lines align with the primary direction of the layout. This alignment is crucial as it provides a clear and coherent visual representation of the data.
The sequencing of nodes within these layers is another critical aspect of the hierarchical layout. The nodes are arranged in such a way that the intersections of connecting lines are minimized. This optimization enhances the clarity of the layout, making it easier for users to understand the connections and relationships between different nodes.
One of the standout features of the hierarchical layout is the variety of styles available for routing these lines. Users can choose from orthogonal, polyline, octilinear, and curved configurations, each offering a unique visual aesthetic. These styles are detailed in the HierarchicLayoutRoutingStyle documentation, providing users with a comprehensive guide on how to best utilize these routing styles.
Hierarchical diagrams, which utilize the hierarchical layout, are particularly effective tools for displaying hierarchical information. They excel in highlighting the interdependencies and connections between graph nodes, providing a clear and concise visual representation of complex data structures. These diagrams are not only effective but also versatile. They can be applied in numerous fields, ranging from visualizing workflows and illustrating call graphs to constructing entity-relationship diagrams, mapping biochemical pathways, and managing networks. This versatility makes them an invaluable tool in many different industries and disciplines.
While the hierarchical layout shares visual similarities with the Tree Layout, it is important to note that it does not restrict the graph to a tree structure. This means that it does not require a tree reduction in cases where the data does not naturally fit into a tree structure. This flexibility is demonstrated in the provided example, where an almost-tree is effectively handled by the hierarchical layout.
However, the hierarchical layout offers much more than just a simple tree arrangement. It boasts a wealth of additional functionality, including features like grouping, layering, and swimlanes. These features provide users with even more options for customizing and optimizing their data visualizations, making the hierarchical layout a powerful and flexible tool for any data visualization needs.
Features
Overview:
- The HierarchicLayout algorithm is used for creating hierarchic layouts of graphs. It can either start from scratch or incrementally add new elements to an existing sketch drawing.
- The algorithm optimizes the arrangement of nodes and edges in the graph to create a visually appealing layout.
Incremental Mode:
- To add elements incrementally to an existing sketch or optimize certain elements, set the layout mode to INCREMENTAL.
- Register an IDataProvider (e.g., using
createHashedDataMap) with the graph using theINCREMENTAL_HINTS_DP_KEYDataProvider key. - Associate hints obtained from the IIncrementalHintsFactory with the elements to be added incrementally.
Node and Edge Layout Descriptors:
- Use HierarchicLayoutNodeLayoutDescriptor and HierarchicLayoutEdgeLayoutDescriptor instances to specify individual information for each node and edge in the graph.
- These descriptors are bound to the graph using IDataProviders registered with
NODE_LAYOUT_DESCRIPTOR_DP_KEYorEDGE_LAYOUT_DESCRIPTOR_DP_KEY. - If no descriptor is assigned to some nodes or edges, a default descriptor will be used. Set default descriptors using
nodeLayoutDescriptorandedgeLayoutDescriptor.
Edge Connection Approaches:
- HierarchicLayout supports two approaches to connect edges to nodes:
- PortConstraints: Define a single constraint for the ports of an edge.
- PortCandidates or PortCandidateSets: Assign these to edges or nodes for more complex port restrictions.
- When an edge with registered PortCandidates connects to nodes with PortCandidateSets, the algorithm tries to match both collections to find an appropriate port.
- If no matching port candidate is found, a PortCandidate specified for the edge is preferred.
- HierarchicLayout supports two approaches to connect edges to nodes:
Edge Grouping:
- The edge grouping feature is restricted to normal, hierarchic edges.
- Edges with recursive edge styles (DIRECTED or UNDIRECTED) will not be grouped.
- Automatic edge grouping can be enabled or disabled.
Port Grouping:
- Port grouping (using
SOURCE_PORT_GROUP_ID_DP_KEYandTARGET_PORT_GROUP_ID_DP_KEY) allows specifying edges that share the same port location at their source/target. - Unlike edge grouping, edges with port groups are routed independently without sharing segments.
- Port grouping is not considered for self-loops.
- Port grouping (using
Node Types and Sequencing:
- The HierarchicLayout supports node types as a subordinate criterion during node sequencing within their layer.
- Nodes of the same type are placed next to each other if it doesn’t cause additional crossings or conflicts with other constraints.
- An additional local optimization heuristic improves placement based on node types, but optimal results are not guaranteed.
Runtime and Maximum Duration:
- The algorithm allows restricting the maximum duration to reduce runtime for large graphs.
- Note that this may impact layout quality, and the actual runtime may exceed the maximum duration as the algorithm searches for a valid solution.
Layout
Layering:
- In the layering phase, the goal is to distribute nodes into layers. This step is crucial for creating a hierarchical structure in the graph.
- Two common approaches are used for layering:
- fromScratchLayerer: This method starts from scratch and organizes nodes into layers. It ensures that nodes with parent-child relationships are placed in adjacent layers.
- fixedElementsLayerer: If some nodes already have fixed positions (e.g., due to external constraints), this approach incorporates those fixed elements into the layering process.
- The arrangement of nodes within each layer depends on the layout orientation. For instance:
- In a top-to-bottom orientation, nodes within a layer are horizontally aligned, and layers are stacked vertically from top to bottom.
Sequencing:
- After layering, the sequencing phase determines the order of nodes within each layer.
- The primary objective is to minimize the number of edge crossings, making the graph more visually appealing.
- Two common sequencing algorithms are used:
- fromScratchSequencer: This algorithm computes the optimal node order from scratch, considering the hierarchical structure and minimizing edge crossings.
- fixedElementsSequencer: If some nodes already have fixed positions (e.g., due to external constraints), this approach incorporates those fixed elements into the sequencing process.
Drawing:
- In the drawing phase, the layout algorithm assigns final coordinates to all nodes and routes the edges.
- The hierarchical structure established during layering and sequencing guides the placement of nodes.
- Edges are routed to connect nodes based on their positions within the layers.
Business Domains
Corporate Management:
- Top-Level Management: This includes executives such as CEOs, CFOs, and COOs. They make strategic decisions and oversee the entire organization.
- Middle Management: These managers bridge the gap between top-level executives and front-line employees. They supervise departments or divisions.
- Lower Management: Front-line supervisors who manage teams directly involved in production, sales, or service delivery.
Manufacturing:
- Production Managers: Responsible for overseeing manufacturing processes, quality control, and production schedules.
- Supervisors: Manage production lines, ensuring efficiency and adherence to safety protocols.
- Assembly Line Workers: Engaged in assembling products or components.
Healthcare:
- Administrators: Manage hospitals, clinics, or healthcare facilities.
- Doctors and Nurses: Provide medical care to patients.
- Support Staff: Includes receptionists, medical assistants, and billing personnel.
Retail:
- Store Managers: Oversee store operations, inventory management, and customer service.
- Department Managers: Responsible for specific sections (e.g., clothing, electronics) within the store.
- Sales Associates and Cashiers: Front-line staff assisting customers and handling transactions.
Banking:
- Bank Managers: Lead branches, manage staff, and ensure compliance with regulations.
- Loan Officers: Evaluate loan applications and assist clients.
- Tellers and Customer Service Representatives: Handle transactions and address customer inquiries.
Information Technology:
- CIOs (Chief Information Officers): Set IT strategy and oversee technology implementation.
- IT Managers: Manage teams responsible for infrastructure, software development, and support.
- Software Developers and Technical Support: Create software and assist users.
Education:
- School Boards: Govern educational policies and budgets.
- Principals: Lead schools and manage teaching staff.
- Teachers and Administrative Staff: Educators and support personnel.
Government Agencies:
- Elected Officials: Represent constituents and make legislative decisions.
- Department Heads: Manage specific government departments.
- Civil Servants and Clerical Workers: Handle administrative tasks.
Military:
- High-Ranking Officers: Commanders and generals.
- Enlisted Personnel: Soldiers, sailors, and airmen.
Hospitality:
- Hotel Managers: Oversee hotel operations.
- Front Desk Staff: Handle check-ins, reservations, and guest inquiries.
- Housekeeping and Maintenance: Ensure cleanliness and maintenance.
Technical Details
Data
The hierarchic layout can be applied on any graph and, like any other yFiles diagram, you have diverse utilities at your disposal to import or create data. The GraphBuilder, in particular, is the way to go if you wish to use JSON data.
In the playgrounds enumerated below you can find an example of how to set up some data.
Layout
Given a graph, running the layout is as simple as:
const layout = new HierarchicLayout();
graphComponent.morphLayout(layout)
The orientation of the layout can be specified like so:
layout.layoutOrientation = 'left-to-right'The distances can be tuned via:
layout.nodeToEdgeDistance = 20
layout.nodeToNodeDistance = 50
There are really too many customization options to highlight here. Please consult the extensive documentation for the many parameters at your disposal.
Playgrounds
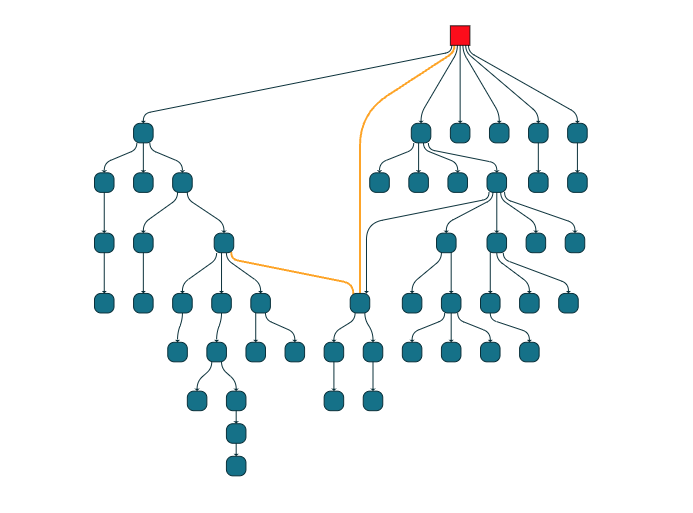
▸ a tree with two edges breaking the tree structure
This playground demonstrates how, in the case of hierarchic layout, a tree-breaking edge can be added.
const nodeCount = 50;

const nodes: INode[] = [graph.createNode()]
for (let i = 1; i < nodeCount; i++) {
  nodes.push(graph.createNode())
  graph.createEdge(nodes[Math.floor(Math.random() * (i - 1))], nodes[i])
}


// turn the tree into a non-tree
// the 0-node is the root
graph.setStyle(graph.nodes.get(0), new ShapeNodeStyle({fill:"red"}))
const e1 = graph.createEdge(graph.nodes.get(0), graph.nodes.get(14))
const e2 = graph.createEdge(graph.nodes.get(10), graph.nodes.get(14))
graph.setStyle(e1, new PolylineEdgeStyle({stroke:"3px orange", smoothingLength:100}))
graph.setStyle(e2, new PolylineEdgeStyle({stroke:"3px orange", smoothingLength:100}))

// without this reduction the balloon layout would fail
const treeReductionStage = new TreeReductionStage()
const ebc = treeReductionStage.edgeBundling
      ebc.bundlingStrength = 1
      ebc.defaultBundleDescriptor = new EdgeBundleDescriptor({
        bundled: true
      })
// both balloon and tree layout will now work since they overlook the breaking edges

const layout = new HierarchicLayout({

   orientationLayoutEnabled:true,
   layoutOrientation:"top-to-bottom"
    });
// layout.appendStage(treeReductionStage);
await graphComponent.morphLayout(layout, '1s')
▸ create a group of descendants
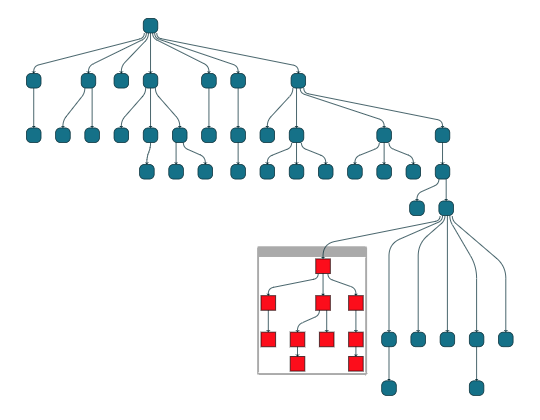
Almost all of the yFiles layout algorithms support groups and we use in this playground the Neighborhood class to collect the children of a node into a group which gets positioned like a standard child in the hierarchy.
const nodeCount = 150;

const nodes: INode[] = [graph.createNode()]
for (let i = 1; i < nodeCount; i++) {
  nodes.push(graph.createNode())
  graph.createEdge(nodes[Math.floor(Math.random() * (i - 1))], nodes[i])
}
graphComponent.graph.edgeDefaults.style=new PolylineEdgeStyle(
  {
    targetArrow:"triangle"
  }
)

const setStyle = (u)=> graph.setStyle(u, new ShapeNodeStyle({fill:"red"}));
// take an arbitrary node
const n = graph.nodes.get(14)

// create a group node
const group = graph.createGroupNode();
graph.setStyle(group,new GroupNodeStyle())
graph.setParent(n, group);
setStyle(n)
// collect the descendands
const algorithm = new Neighborhood({
  maximumDistance: 10,
  startNodes:[n],
  traversalDirection: TraversalDirection.SUCCESSOR
})
const result = algorithm.run(graph)
// highlight and put in group
for (const node of result.neighbors) {
 setStyle(node)
 graph.setParent(node, group)
}

const layout = new HierarchicLayout({

   orientationLayoutEnabled:true,
   layoutOrientation:"top-to-bottom"
    });
// layout.appendStage(treeReductionStage);
await graphComponent.morphLayout(layout, '1s')