from pydantic import BaseModel, Field
from typing import Literal
from langchain_core.tools import tool
from langchain_ollama import ChatOllama
from langchain_openai import ChatOpenAI
from langgraph.graph import MessagesState
from langgraph.graph import StateGraph, END
from langgraph.prebuilt import ToolNode
import random
import nest_asyncio
nest_asyncio.apply()Graph Flow (LangGraph)
LangGraph
GraphAI
How to use LangGraph as a generic workflow engine or state machine.
Note: you can also find the LlamaIndex flavor of this setup.
LangChain has a graph flow which alleviate the problems one has with typical linear chains. Well, the name says it, a ‘chain’ is a sequence of actions or tasks. There are many situations where a chain is not the best way to represent a process. For example, if you have a process that can be executed in parallel, a chain is not the best way to represent it.
The graph flow is a directed graph where the nodes are the tasks and the edges are the dependencies between the tasks. The graph flow is a powerful tool to represent processes that have parallel tasks, loops, and conditional tasks. Although it is geared towards LLM, you can use the framework as a generic state machine and in the code below you can see how to do this.
First, import the necessary package:
Note the asyncio import, it’s only necessary if you are running the code in a Jupyter notebook. If you are running the code in a script, you don’t need to import asyncio.
Next, define the state of the flow. This state is global in the sense that state is not passed from one node to the other but shared by the flow as a whole. It’s like a board where all the nodes can read and write. The state is defined as a Pydantic model:
class AgentState(MessagesState):
    final_response: str
    num: int
    tried: int
    happy: bool
Inside the state you can add anything you want, it’s in essence just a dictionary with runtime info. In our case, we will generate a number provided a threshold is hit. The threshold is 0.9, so 90% of the time we will not generate a number. If the number is generated, we will set the happy flag to True, otherwise it will be False. The number is stored in the num field and the number of times we tried to generate a number is stored in the tried field. The final_response field is used to store the final response that will be returned to the user.
This silly loop is to show how one can loop inside the flow and finally exit when a condition is met. In a chat situation, you would keep trying to improve an answer or call a tool until some quality threshold is met.
Next we define functions which will act as nodes in the graph (flow). These functions are called when the flow enters the state. Every node has a name and one usually reuses the name of the function. These (string) names are used to create edges and to wire things up.
def generate(state: AgentState):
    if random.random() > 0.9:
        return {"num": random.randint(1, 100), "tried": state["tried"] + 1, "messages": [("human", "Found a number!")] }
    else:
        return {"num": 0, "tried": state["tried"] + 1, "messages": [("human", "")]}
Two additional nodes: evaluate and respond. The evaluate function is used to evaluate the state and return a dictionary with the evaluation results. The respond function is used to respond to the user. The respond function returns a dictionary with the final response. The final response is a Pydantic model that is used to define the response that will be returned to the user. In this case, the final response is a NumberResponse model that contains the number that was generated.
def evaluate(state: AgentState):
    return {"happy": state["num"] > 0}

# Define the function that responds to the user
def respond(state: AgentState):
    print("Packaging state of the non-zero number ", state["num"])
    return {"final_response": state["num"]}
The above defines the nodes of the graph, now we need to connect the nodes. There are two ways in which you can do this: either by defining the edges manually or by defining a function that will determine the next node to be executed. The latter is useful when you have conditional nodes. In this case, we will use a function to determine the next node to be executed. The function should_generate will determine if the generate node should be executed or if the respond node should be executed. The function should_generate will return the name of the next node to be executed.
def should_evaluate(state: AgentState):
    return "evaluate"

def should_generate(state: AgentState):
    if state["happy"]:
        return "respond"
    else:
        return "generator"
Let’s assemble the workflow and compile it:
workflow = StateGraph(AgentState)
# Add the nodes to the graph
workflow.add_node("evaluate", evaluate)
workflow.add_node("generator", generate)
workflow.add_node("respond", respond)

# Add the conditional edges to the graph
workflow.add_conditional_edges(
    "evaluate",
    should_generate,
    {
        "generator": "generator",
        "respond": "respond",
    },
)

# Add the static edges to the graph
workflow.add_edge("generator", "evaluate")
workflow.add_edge("respond", END)

# Set the entry point of the graph
workflow.set_entry_point("evaluate")
graph = workflow.compile()
A few things to note:
- you need to assign the starting node, the graph does not know where to start from the topology alone
- if you have a dynamic edge you don’t need to create a static one first. The graph will figure it out for you. If you have a static edge and a dynamic one, the whole flow will lead to unexpected jumps. It took me a long time to figure this out.
- the end of a flow is defined by the
ENDconstant and an edge towards it means the flow will halt there - you need to ‘compile’ the flow in order to let the framework assemble the necessary data structures and to validate it.
To run a LangGraph flow you invoke it with a starting state. This initial state should match the predefined state model:
config = {
    "recursion_limit": 50
}
answer = graph.invoke(input={"messages": [("human", "abc")], "num": 0, "tried": 0, "happy": False},config=config)
print("Tried:", answer["tried"])
print("Number:", answer["final_response"])
print("Messages:", len(answer["messages"]))
Packaging state of the non-zero number 56
Tried: 2
Number: 56
Messages: 3The config specified the recursion limit because the 10% change will lead to an indefinite amount of times the flow will loop. The recursion limit is set to 50, which is enough for this example. There a few ways you can see/render the flow, GraphViz is one of them:
from IPython.display import Image

display(Image(graph.get_graph().draw_png()))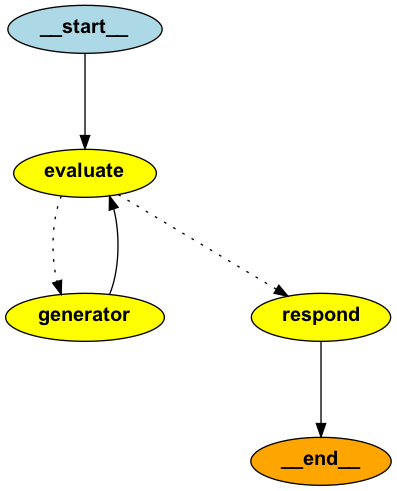
This setup shows that you can use LangGraph as a generic workflow foundation with or without LLMs. Using standard Python functions as nodes is a powerful way to define complex workflows and allows one to debug things with ease.
Of course, there is much more:
- serializing the flow state and resuming it later, this is called checkpointing. The framework has
MemorySaver,SqliteSaverand more. This allows one to step back into a flow and continue from where it left off. - human-in-the loop, where a human can intervene in the flow and guide the process
- parallel flows, where multiple flows can run in parallel and communicate with each other
- returning (Pydantic) structure for downstream processing. This makes a flow behave in a more predictable way and allows for easy integration with other systems.